Are you looking to start in real estate photography and searching for the best HDR software? Are you already a real estate photographer needing an HDR software program to make your photos look sharp and engaging for your clients? Or are you a professional photographer working in multiple areas, including real estate and event photography and wanting that professional look? Here are the best and most advanced HDR programs to help you present your best photography work.

Most Popular HDR Software For Real Estate Photography

1. Aurora HDR

Aurora HDR works with Mac and Windows-based operating systems. It can also work as a stand-alone program, but is compatible with Adobe Lightroom and Adobe Photoshop. Aurora HDR is an Artificial Intelligent (A.I.), powered software that makes editing your photos for HDR seamless and fast. Aurora HDR reduces those unwanted halos, artifacts, and chromatic aberration from your photos. Aurora HDR includes popular filters to quickly add that spectacular look to your photos. When you are photographing for real estate, time is important and so you want a program that is easy to navigate. Aurora HDR is a solid HDR photo editor for any photographer. Select this program if you are looking for a comprehensive A.I powered HDR editor.

2. Nik HDR Efex Pro

Nik HDR Efex Pro is compatible with Mac and Windows-based operating systems. Nik Collection is owned and managed by Google, which makes Nik Collection reliable and a powerful tool in your photography arsenal. Nik HDR Efex Pro makes merging your exposures into HDR simple and fast. Nik HDR Efex Pro uses Nik Collection’s U POINT technology for precision. Using the U POINT control points, you can edit for exposure, saturation, brightness, and contrast. Nik HDR Efex Pro is a top rated stand, a lone program for the real estate photographer or the everyday photographer. Nik Collection has a lot of tutorials to support you in learning the best techniques to edit HDR photos in Nik HDR Efex Pro.

Best Advanced HDR Photography Software

1. Photo Matix Pro 6


Photo Matix Pro 6  is compatible with Mac and Windows-based operating systems. Photo Matix Pro 6 also has plugins for Adobe Lightroom and Capture One. Photo Matix Pro 6 has a lot of resources to support you in creating your best HDR photos. You can watch easy to follow videos that help you set up your camera so you can quickly edit your photos in Photo Matix Pro 6 later. Photo Matix Pro 6 is an easy platform to use for professional and hobby photographers. Photo Matix Pro 6 produces the quality that you desire from a professional HDR editing software. Photo Matix Pro 6 comes with 6 HDR styles and over 70 HDR settings to create the best eye popping photos for your clients. With Photo Matix Pro 6 batch processing, you can quickly edit your photos, saving you time and streamlining your workflow. Photo Matix Pro markets itself for Real Estate Photographers, but it has uses for any style of photography, including events and landscape.

2. Adobe Lightroom


Adobe Lightroom is a photo management and photo editing software for professionals and the everyday photographer. Lightroom is compatible with both Mac and Windows-based operating systems. It is a stand-alone program that is often bundled with Adobe Photoshop. Adobe Lightroom is the industry standard for photo editing software. Adobe Lightroom is a subscription based software that comes with award-winning design and a wealth of tutorials for HDR photography. Lightroom is an easy to use and easy to navigate platform. Adobe Lightroom allows for photo editing anywhere, even HDR photo merging. On the go from anywhere photo editing streamlines your workflow and helps you get your finished product to the client quickly and looking amazing. Adobe Lightroom’s HDR photo merging produces natural looking HDR photos you can fine tune for that desired look. Adobe Lightroom is an excellent choice for the professional photographer since you do not need an additional plugin or a separate stand, a lone HDR editor.

There are a lot of other HDR editors out there, but if you are looking for the best or the most professional HDR editors, here they are. The list above puts together some of the best HDR editing programs for any photographer in 2021, but these are especially great for the real estate photographer who wants high-quality photos for their clients and needs a reliable and easy-to-use platform.

https://www.adobe.com/

https://www.hdrsoft.com/

https://skylum.com/

https://nikcollection.dxo.com/hdr-efex-pro/

If you face troubles editing real estate photos, these real estate Lightroom presets will be a simple, and effective, way to improve the quality of your real estate images that provide an incredible boost to a sale potential of the property. Additionally, they take no more than 30 seconds on one photo so that you can turn your shots into masterpieces with a single click.

With so many options out there, even with free or paid presets, it’s hard to find out which stands out the most. That’s why we’ve collected some of the best real estate Lightroom presets,all tailored to provide your photos with a professional finish.

Read on to see our list of the best Lightroom presets for real estate photography whether you are a beginner or professional!

Related: Basic Editing Real Estate Photos Using Lightroom

Real Estate Mobile and Desktop Lightroom Presets by Creative Tacos

This Real Estate Mobile & Desktop Lightroom Presets from Creative Tacos contains 11 carefully handcrafted filters specially developed for Real Estate Photography. It allows beginners to quickly enhance your images by adding custom film tones and make perfect looking photos within just a click. It’ll be perfect for any type of photography like interior photography, exterior photography, outdoor photography, lifestyle photography, creative photography, travel photography, streets photography, urban photography, landscape photography, fashion photography and wedding party photographers. The presets can enhance the color, contrast, brightness, and saturation of your RAW photos. Another good thing is that the presets also work on Lightroom mobile, which means iPhone real estate photographers can swiftly shoot and edit images on one device.

real estate photo editing presets

Real Estate Mobile & Desktop Lightroom Presets from Creative Tacos

HDR Real estate lightroom presets by Presetsh


real estate lightroom presets

These HDR Real estate lightroom presets by Presetsh can make your editing workflow simpler by applying sharp and vibrant effects to otherwise blurry or dark images. The collection’s specialty is helping reduce image noise, especially in darkened parts of a photo.

This collection contains 20 carefully crafted Lightroom presets and photoshop specially developed for Real Estate and Interior photography. Achieve stunning image results within minutes and enjoy an easy and fast workflow!

You will manage to get high quality pictures that can describe you as a qualified real estate photographer in your area. In case you notice much noise, many darkened areas on your photos or want to change the color palette, this package would be the perfect variant to speed up your photo editing.

Real estate Photoshop Actions by Presetsh

real estate photo editing presets


Another one by Presetsh, the Real estate Photoshop Actions are Sharpening Actions that will give your images a sharp, detailed, clean look. It’s all about Bright, Sharp, Dramatic Focus, Color Toning, Saturation, Highlights, and Details. All of that together will perfectly emphasize your space, which is made for the exterior of the building, helps to multiply the beauty of your real estate photos.

These effects will improve brightness, contrast, enhance textures and lend a professional look to your works. This tool kit will help you achieve the most efficient results when editing inside and outside images, as it makes colors richer and removes unnatural hues, such as yellowness or retro effect.

LUXURY INTERIOR for Real Estate by LightroomPresetChest


real estate photo editing presets

This high contrast LUXURY INTERIOR for Real Estate by LightroomPresetChest will change the look of your real estate photos for your listings, Instagram or any other Social Media feed! It is ideal for Realtors, Real Estate Agency, Real Estate Blogs, Property Photographers, Lifestyle photos, Social Media Real Estate and Instagram Property Rental Influencers. By balancing the light and dark colors, the filters help you create an attractive atmosphere to help buyers imagine what it’s like living in the property. The tones and highlights remain well-exposed even if you want to transform the property into a dark, moody space.

Clean Design Presets by artmyhouse


real estate photo editing presets

With the Clean Design Presets for Lightroom and Photoshop, you can balance stylish vibes and minimalism for interiors and exteriors. Even if the property has monotonous color palettes, the filters provide a lovely range of colors to expose the darker side of your real estate images. Moreover, the presets are very user-friendly, so you won’t have any difficulties installing or customizing them. Just one click and you are ready to go posting your favorite photos on Instagram or Facebook.

50 Color Correct Presets by Lou&Marks

real estate photo editing presets


Use these 50 Color Correct Presets by Lou&Marks to Color Correct your Real Estate Photography. These presets make walls white, help reduce blowout highlights, brighten up shadows, and a pop of a color, and sharpen overall real estate images. I
With a one-click application, the preset can improve brightness, intensity, saturation, and color tones. Additionally, the presets work on perfecting shadows and highlights to ensure evenly-exposed shots.

Brixton Film Bold & Vibrant Lightroom Presets

real estate photo editing presets


Containing 8 layers presets and 33 local adjustment brushes, the Brixton Film Bold & Vibrant Lightroom Presets can give your images spirited and energetic vibes. This collection is perfect for real estate photographers who love chroma shifts and contrasts.

Giving a modern spin on classic film reels, the presets provide charming vintage pops of color for those who prefer rich, moody, desaturated, or metallic tones. Use this bundle to make clouds lighter, enhance green colors and add volume to the building by eliminating unnecessary sharpness. It will show the beauty of your home in a favorable light, give a professional look to your photos and help you make them more commercially successful.

Night Urban Lightroom Presets by Alexander Zhuk

real estate photo editing presets


Dealing with low light levels is the challenge of retouching night and twilight real estate photographs. With these Night Urban Lightroom Presets, you can make both the subject and sky background look homey yet modern. These urban presets will add detailed city tones and make your photos look full and enriched
Even after applying the filter effect, you can still tweak the settings to emphasize the light inside properties, manipulate shadows, and enhance the stunning sunset or dusk.

Real Estate Entire Collection by FixThePhoto

real estate photo editing presets

The Real Estate Entire Collection by FixThePhoto is basically a complete collection of presets to make your real estate photo editing perfect! It includes 120 Lightroom presets and bundles together 3 premium interior and exterior collections!
Additionally, this series allows you to edit both interior and exterior photos. Being especially great for street, car and architectural photos taken in cloudy weather, this tool gives your images an impressive look.

Editing is an essential part of the photography process, especially for real estate photos. For a professional real estate photographer, spending your time to edit photos is somehow a waste since you could rather spending it to take more orders. To help you get your photos edited as quickly as possible so you can get out shooting again, we’ve compiled a list of Lightroom tips just for you.

Lightroom is photo management and photo editing, combined into a single tool. This software is filled with great features that can make your work much faster and easier. It’s perfect for all levels of photography, starting with beginners. Lightroom is especially essential if you shoot in RAW, a far better file format to use than JPEG, as more detail is captured.

Have a look at the tips below to help you work quickly, and also deliver high-quality photos!

Fixing Perspective & Distortion


basic editing real estate photos using lightroom

One of the most basic, yet most necessary editing that needs to be done on all real estate photos is fixing perspective and distortion. This can be easily done on Lightroom.

Auto Mode

This applies basic balanced level, aspect ratio, and perspective corrections for real estate photos.

Guided Mode

When you hover over your image, a magnifying loupe will appear to help you create your guides along lines with precision.

Level Mode

This mode will look for a horizon line and attempt to straighten the image when you find it difficult to straighten an image by eye.

Vertical Mode

This mode adjusts similarly to Level Mode but mainly fixing the vertical details.

Full Mode

This mode is a combination of all the previously mentioned modes. It can be heavy handed and is very powerful and can become something entirely different from your original images. So be careful before you make it go too far!

Manual Sliders

These sliders can be adjusted alone for each purpose or used together with the Modes.

Adjusting brightness/contrast

One of the common problems when shooting real estate photos, especially interiors, is that you don’t have enough natural light which leads to dark images. By adjusting Brightness/Contrast, you can enhance your photos easily.

basic editing real estate photos using lightroom

– Brightness is commonly known as the slider that adjusts the midtones. And although many people think that this is all the brightness sliders do, there’s a little more to it. All of the settings still change when utilising the brightness slider, but it preserves the highlights better than simply dialing up the exposure. And it affects the midtones more nicely than pumping up the exposure. The Brightness slider automatically accounts for the appropriate contrast. There is still a separate contrast control available for finer control.

Clicking on the exposure slider at the top of the Basic Panel, move it right to brighten, or left to darken.

– For the contrast, click the Contrast slider in the tone section.

Simply move the slider to the right to increase (or left to decrease) the contrast in the image. If you want more control, check out the Tone Curve section. You can either move the sliders or the line on the graph at various points to create the level of contrast that your image needs.

Adjusting white balance

White balance is the color temperature of an image, as it was captured by your camera. Most cameras should have a setting for this. But it also depends on the natural light and your personal taste. If you want to adjust the white balance for real estate photo editing, there are 3 ways to do so.

– Using the Lightroom eye dropper

+ Click on the eyedropper tool in the Basic Panel and find a neutral color by moving it to a part of your image. You can check the RGB percentages on the tool as you go over some areas of the photo. It would be best to pick white or a gray area.

+ Once you click on the right color, this will automatically correct the white balance on your image. The white balance will not change until you click your mouse, so take your time to find the right spot. If you do click and then decide the new white balance is not quite right, you can do it all over again.
+ Adjust the temperature and the tint as to your liking. Increase the temperature a bit if the photo is too blue and bring the tint to the right.

+ Add some contrast and bring in some exposure to the photo. Just adjust the contrast and exposure bar as you seem fit.

– Lightroom white balance preset options

+ In Lightroom you will find the white balance options: Auto, Flash, Daylight, Cloudy, Shade, Tungsten, Florescent, and Kelvin. Simply clicking drag drop list Custom to find those options then clicking each white balance preset until you find one that works for your image!

+ For example if you used cloudy in camera but the image came out too warm, you can try Tungsten, which is a cooler white balance setting to balance out the warmth.

+ Adjust the temperature and the tint as to your liking. Increase the temperature a bit if the photo is too blue and bring the tint to the right.
Add some contrast and bring in some exposure to the photo. Just adjust the contrast and exposure bar as you seem fit.

– Manually adjust temperature and tint in Lightroom
+ Find the Temp and Tint adjustment in the Basic Panel
+ Drag the icon to your liking. Temperature determines how warm or cold your image looks (yellow or blue), and tint adds green or magenta (a pinkish tone). By combining these you’ll be able to get a natural look for your images.

basic editing real estate photos using lightroom

· Vibrance: Changing vibrance changes the intensity or dullness of certain colors in your image.

Vibrance and Saturation can be found under the Develop tab, under Presence in the Basic Panel. Simply move the sliders along until you get the desired effect. Just be careful not to overdo it as too much saturation will make the image look fake.

Applying lens correction


Lens Corrections feature in Lightroom can be copied from one image to another, applied to hundreds of images at once, or can be set up as an import template, automatically applying corrections to images during the image import process.

– Basic Mode

Go to the Develop module or press “D” on your keyboard, then move the right window down until you get to “Lens Corrections”, and check “Enable Profile Corrections” under the Basic Mode.

– Profile Mode

The Profile Mode is the second tab and it contains fields that allow you to pick the lens of choice and apply custom distortion and vignetting levels if you want to go into more options to modify or fine tune corrections.

– Color Mode

This mode is used if you want to use the manual that allows sliders to set custom purple/green hues and amounts to reduce or remove chromatic aberrations. Otherwise, it’s similar to other modes.

– Manual Mode

Basically, if you have an unsupported lens, you can apply manual corrections of distortion and vignetting on your images. There are many different sliders available in this tab that allow you to fine-tune each setting.

Dodging and burning


Local adjustments are when you want to adjust light in a particular part of the image. By selecting the Adjustment Brush (hit K on your keyboard to activate it) located under the histogram on the right-hand side, you can then selectively dodge (lighten) and burn (darken) only certain areas.

– Take your brush tool and make sure that you adjust the exposure, feather, flow (keep the feather number high to blend the changes more naturally), and opacity (keep it low to apply edits gradually just like if you were painting).

– Drag the brush on the areas where the light beams from the fixtures are naturally hitting, like the floor or ceiling. Drag over these areas to brighten the area. This technique adds some shine to the light in the room.

-You can create a new brush with every beam that you add to make the light beams different every time.

They say that pictures paint a thousand words. However, taking some raw images is not all. The post-production process in creating great real estate photos is way more important since many buyers rely on the photos they see online to decide whether a property is for them or not. This work can be done by professional real estate photo editing services that specialize in real estate photos.

As an expert in the field, 300Photo knows how to quickly and efficiently achieve the best real estate photography standards needed to sell.

Here are 5 reasons why you need a professional real estate editor:


Professional Real Estate Photo Editing Services

Updated techniques and software

Professional editing companies have experienced professionals and the latest technology and software under them. They utilize the best in the industry to help you get the photo that you want. Their business focuses on producing the quality of images that you need. There is not one but an entire team of dedicated and skilled photo editing expert.

Save your time

Working as a real estate photographer means you have to sell your services, negotiate the deal, set up the shoot, shoot the property, edit images and send them to your clients. Moreover, this market standard often requires you to shoot and deliver images within 24 hours for competitiveness. If you have a huge volume of photos and work that needs to get done in a short period of time, outsourcing is the best option to go for. With extra help you don’t have to worry about the quality of editing and simply spending more time with the people you love. You can also benefit from outsourcing if you are an individual photographer with no editing team of your own.

Variety of editing services

You need to do several things to produce the perfect real estate photos, such as removing, adding objects, enhancing and other methods. But you don’t have time to expertise all these skills so why not leave the adjustments to the experts.

At 300Photo, our real estate photo editing services include single or HDR with basic and premium plans, we also provide real estate virtual staging, day to dusk conversion, and real estate video editing. Instead of having to have 4 or 5 different providers, you can now use one system for all of your real estate marketing needs.

What services 300Photo offers to you?

1. Cut down expenditure

As a business, it is important to keep your costs down in order to have more profit. Having a fulltime editor in house costs you more than having your real estate image editing outsourced. Photo editing services done by professional companies are reasonably priced and are usually more cost-effective compared to hiring one yourself. This allows you to increase your profits while keeping expenditures down.

2. Get work done within the night

Many of the professional real estate photo editing companies like 300Photo are on the other side of the globe, which means they work on your photos while you hang out for dinner or soundly asleep. You can totally relax knowing that there’s a professional team working on your photos and by the morning the next day, you are ready to deliver the well-edited images to your clients. It is a big plus that stands you in higher places than other photographers.

Having photos professionally edited does make a difference in the world of real estate. When outsourcing this service, it is important that you shop around and find the best one that suits your business. Look for real estate photo editing outsourcing companies that have dedicated years to perfecting their craft. You could hire a professional to guarantee every photo is ready for publishing, and you won’t have to worry about time, additional costs, and standards.

Research shows that professional real estate images help increase about 32% in selling houses and properties. Stunning images of the interior or exterior of a house give your business a sense of professionalism and credibility and make you stand out from your rivals. Luckily, the market is full of a variety of photo editing softwares to improve your images quickly and affordably without high-priced real estate photography gear. In this blog post, we have listed the top 7 real estate photo editing softwares that real estate photographers and photo editors should use to make your real estate photos professionally edited with minimal effort and free.

1. Adobe Photoshop

Price: US$20.99/mo

Advantages: 

  • A huge variety of design tools
  • Increase resolution of photos
  • Rich format support

Disadvantages:

  • Photoshop is expensive
  • Less support for vector graphics
  • Full functionality may not be utilized by every user
  • Poor image management

Adobe Photoshop is the industry standard software when it comes to editing, retouching and prepping up photographs and ambiance attributes.  In fact, the uses of Photoshop in real life are limitless. Adobe Photoshop is definitely the greatest editing software that we highly recommend in real estate photo editing services. Using this, users can modify several image aspects and combine various exposures into one single HDR image. You can create HDR images in Photoshop and edit them using the same software as well. However, Photoshop is not easy to master and it takes a lot of time in order to be able to use Photoshop in the most appropriate manner so as to get desired outcomes.

real estate photo editing softwares

A variety of design tools are difficult for beginner photographers and editors

2. Adobe Lightroom

Price: US$119.88/yr

Advantages: 

  • Simple, clear interface
  • Automatically syncs photos to cloud storage
  • Powerful raw profiles and filters
  • Panorama and HDR stitching

Disadvantages:

  • Expensive
  • Limited sharing
  • Can’t choose which photos to sync
  • No local printing
  • No plug-in support

Adobe Lightroom has a clear, simple interface (source: Adobe)

Adobe’s Lightroom photo software has long been a favorite among professional photographers. They now have a choice of flavors: Lightroom and Lightroom Classic. The first (the subject of this review) is primarily designed for serious beginner photographers who want to access their photos online and use some powerful editing and organizing tools. Lightroom Classic retains the program’s traditional interface and toolset for working professional photographers. Adobe has been gradually adding features to bring the newer sibling up towards parity with Classic. Unfortunately, the new program still lacks local printing, tethering, and plug-in support—among other things. It’s still one of the best editing softwares for real estate photo editing.

3. Aurora HDR

Price: US$99

Advantages: 

  • Integrated file management/cataloging system
  • Arrangement into collections and galleries
  • Quick and intuitive slide creating
  • Editing steps can be synchronized

Disadvantages:

  • No lens correction profiles 
  • Localized retouching is limited 
  • Pricing of Add-on LUT packs is not friendly

Many real estate photographers choose to shoot in HDR which specializes in exposing details in the shadows and highlights of an image. Aurora HDR 2021 features a new Quantum HDR engine with artificial intelligence-based tone mapping technology. With these, your photo merging gives natural results. The new HDR engine helps in tone mapping and aligning your images as well as any camera movement between your bracketed images.

Aurora HDR is one of the best HDR software for real estate photography (source: Cultured Kiwi)

Nevertheless, if you consider small details, it is difficult to compare Aurora with any other software. It produces really stunning photos due to its intelligent automated algorithms. So if you are searching for the best HDR software for real estate photography, Aurora definitely deserves your attention.

4. Luminar AI

Price: US$99/life

Advantages: 

  • Use Luminar AI as a plugin with Adobe Photoshop and Adobe Lightroom
  • The interface is user-friendly and easy to learn 
  • Ideal for individual photographers and editors
  • Produce great AI-based results

Disadvantages

  • Doesn’t provide that much control over your photos as AI does most of the work
  • You can’t migrate your photo catalog from Luminar 4 to Luminar AI

The interface of Lunminar AI is user-friendly and easy to learn (source: Skylum.com)

Luminar AI is an advanced and powerful real estate photo editor based on artificial intelligence that allows creators to save time and achieve desired results. It is created to help you make complex edits and achieve professional results in the minimum amount of time.

You can use Luminar AI as a standalone image editor or as a plugin with Adobe Lightroom and Photoshop. So, if you are already using these Adobe products, Luminar AI can add great convenience to your workflows.

Moreover, you can use Luminar AI even if you are a complete beginner or a seasoned editor. But, advanced users might find using it as a plugin to other software more practical and compelling.

5. Photomatix Pro 6

Price: US$99/life

Advantages:

  • Lots of nice tools for adjusting HDR photos.
  • Selective brush tool is effective for specific edits.
  • Variety of presets including custom presets.
  • Good amount of written tutorials and tips.


Disadvantages:

  • A bit time-consuming learning the program.
  • Issue with undoing brush tool strokes.
  • Limited file sharing options when exporting an edited image.

Pixlr is a great program for individual real estate photographers and editors who want to have a decent photo editing tool at hand.

For real estate photographers looking for something simple and easy to use, Photomatix is a great option. Though it may not have all of features like Photoshop or Lightroom, it proves to be an approachable choice for beginners that might feel overwhelmed by other real estate photo editing softwares. Photomatix, unlike some of its competition, keeps things simple and easy to understand. Whether used as a standalone or plugin, Photomatix Pro is certainly a program worth considering for your HDR needs. HDRSoft offers a cheaper and less extensive version of the program called Photomatix Essentials for those who edit as hobbyists or have no need for advanced tools.

6. Photomatix Pro 6

Price: US$99/life

Advantages:

  • Lots of nice tools for adjusting HDR photos.
  • Selective brush tool is effective for specific edits.
  • Variety of presets including custom presets.
  • Good amount of written tutorials and tips.

Photomatix Pro is a program worth considering for your HDR needs (source: softwarehow)


Disadvantages:

  • A bit time-consuming learning the program.
  • Issue with undoing brush tool strokes.
  • Limited file sharing options when exporting an edited image.


For real estate photographers looking for something simple and easy to use, Photomatix is a great option. Though it may not have all of features like Photoshop or Lightroom, it proves to be an approachable choice for beginners that might feel overwhelmed by other real estate photo editing softwares. Photomatix, unlike some of its competition, keeps things simple and easy to understand. Whether used as a standalone or plugin, Photomatix Pro is certainly a program worth considering for your HDR needs. HDRSoft offers a cheaper and

7. PaintShop Pro

Price: US$99.99/life

Advantages:

  • Photoshop-like features at a lower price
  • Powerful effects and editing tools
  • Help and tutorials
  • Good assortment of vector drawing tools
  • Automatic noise removal

Disadvantages:

  • Inconsistent interface
  • No macOS version
  • Some operations slow

PaintShop Pro is one of the most straightforward real estate photo editing software (source: dreview.com)

Photoshop is a magnificent tool, but many real estate photographers could do everything they need in PaintShop Pro without having to pay monthly tribute to Adobe. PaintShop Pro is easily one of the most straightforward photo editing software options online for people who want a simple but effective approach to upgrading their images. Though it might not be the most advanced tool in the market at first glance, it comes with everything you need to take your images to the next level without breaking the bank.

The newest version of Corel PaintShop Pro also boasts a new Photography Workspace, specifically designed for photographers. This simplified workspace streamlines your edit workflow by offering the best photo editing tools in a simple format. In fact, you can apply most of the tools in the Photography Workspace in just one click!

And, with more tools for high-quality photo-editing, PaintShop Pro has more unique tools lacking in Photoshop.

less extensive version of the program called Photomatix Essentials for those who edit as hobbyists or have no need for advanced tools.

Which Photo Editing Software is Right for You?

If you’re looking for a simple, free real estate photo editor that handles basic edits, then Pixlr may work. While it doesn’t improve your photo editing skills, it’s great for photographers who only need to make a small adjustment to one or two images on a budget.

For more serious editors and photographers who look for a perfect real estate photography editing, we recommend the powerful industry standard editor Adobe Photoshop and  Lightroom. In fact, 300Photo has been using Photoshop from the very beginning until now to handle some of the most difficult images. Since they are subscription based, you’ll be among the first to access cutting edge editing features as they release them.

Once you’ve got your pictures edited with one of our photo editing software picks from above, these high-quality images entice potential buyers to visit the property.

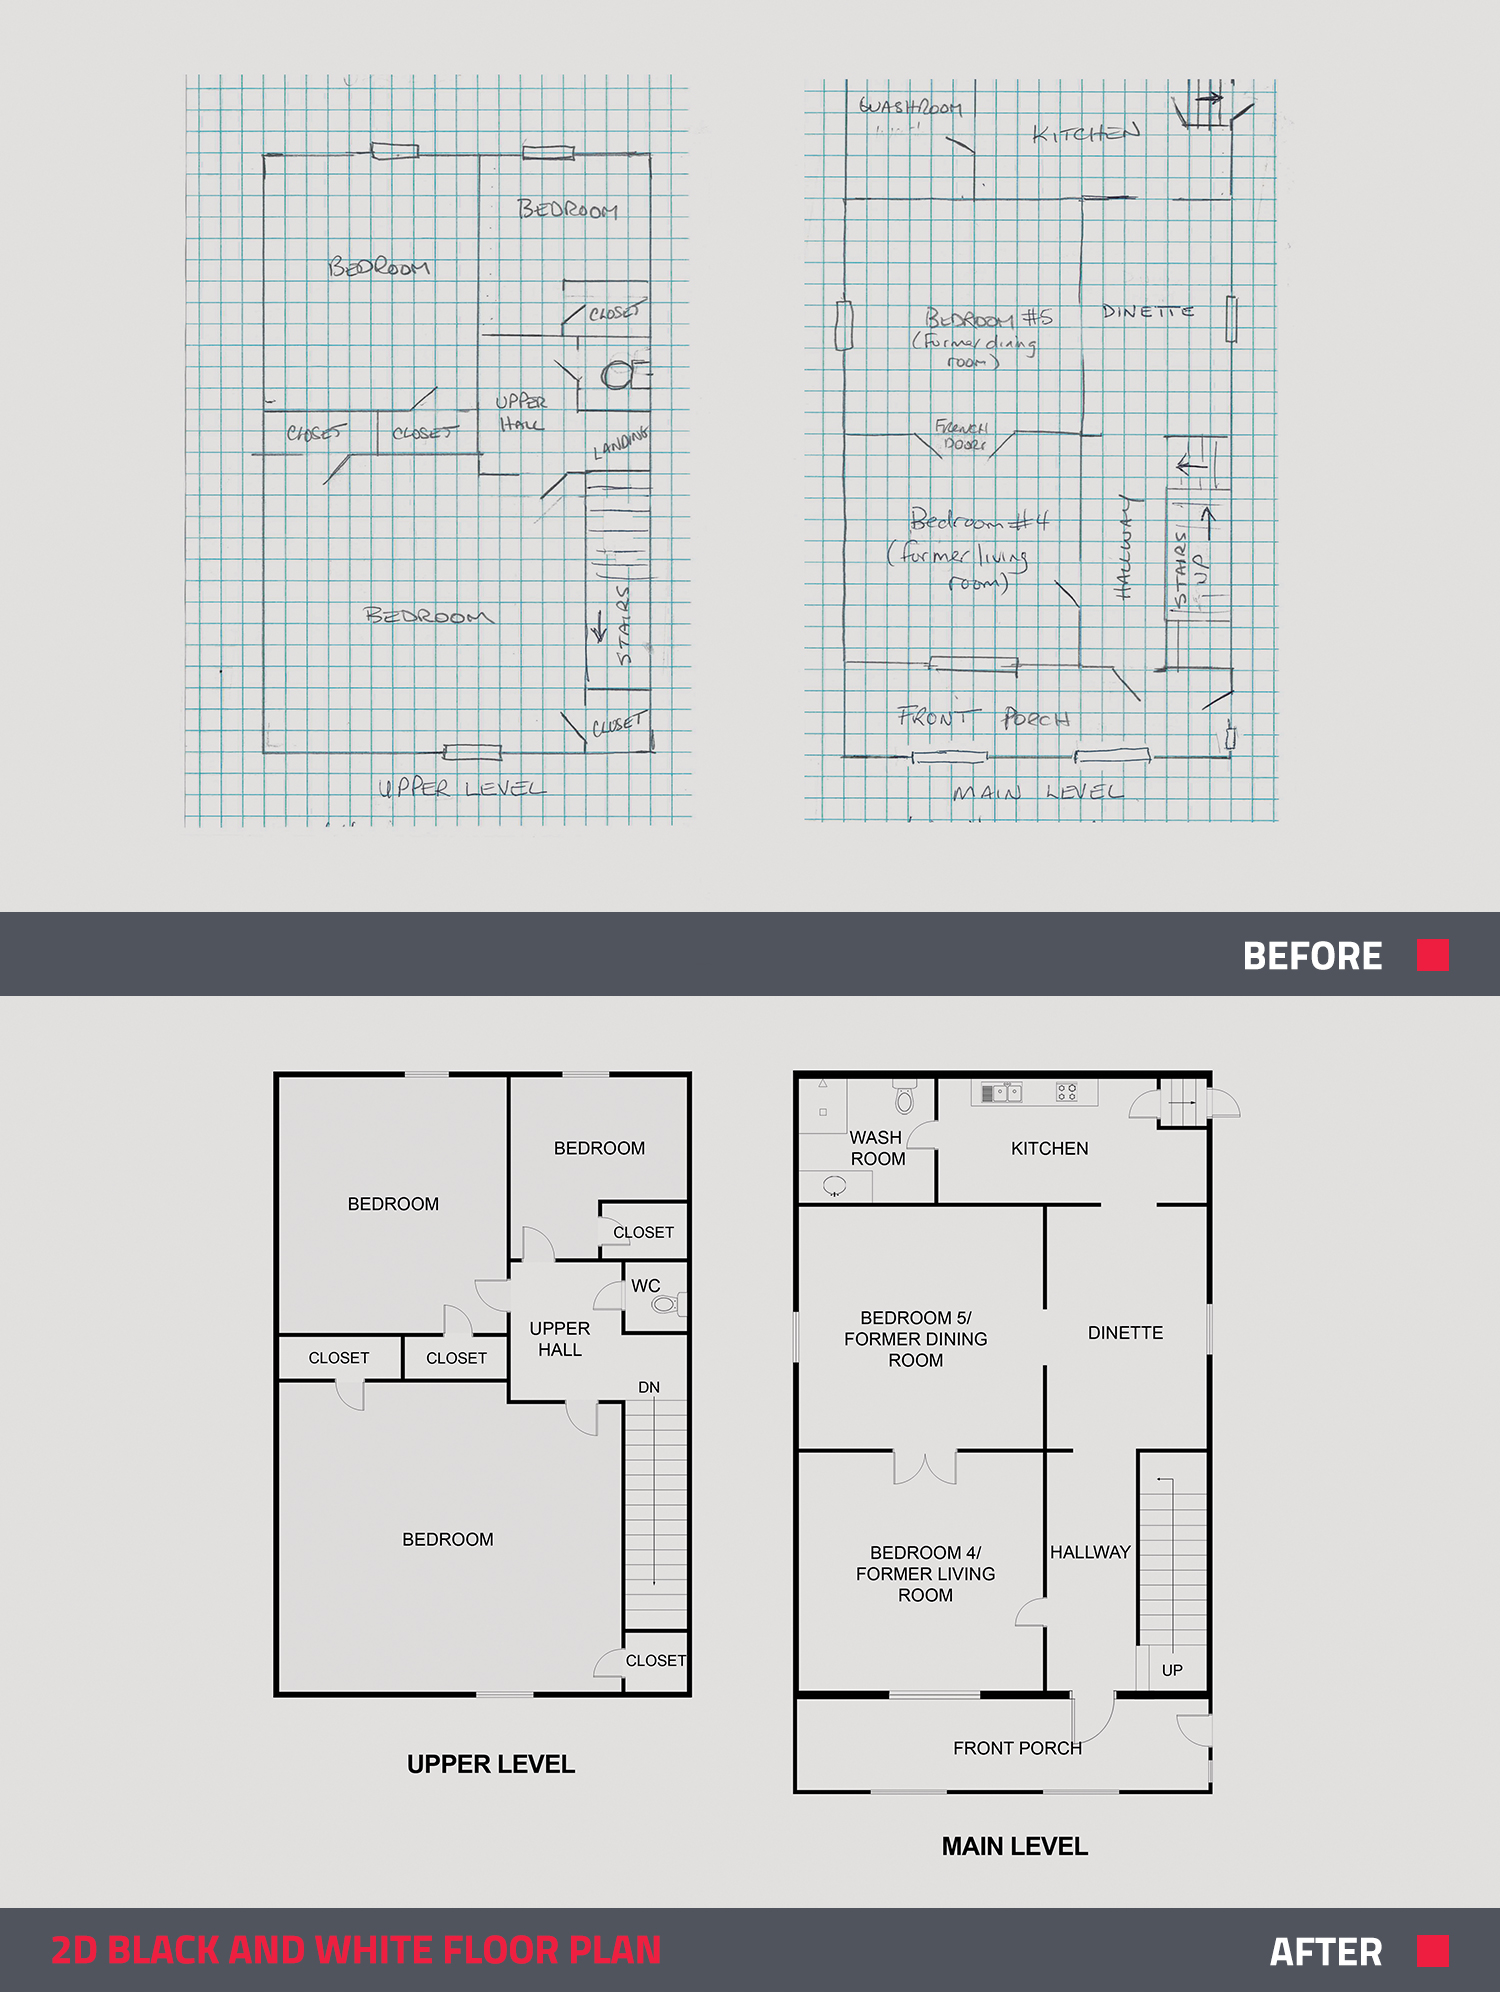
With all of the flashy real estate marketing tools available today, the good old floor plan can be overlooked. This might be a mistake. Research shows that real estate floor plans remain among the most effective aspects of property marketing.

floor plans

With all of the flashy real estate marketing tools available today, the good old floor plan can be overlooked. This might be a mistake. Research shows that real estate floor plans remain among the most effective aspects of property marketing.

With all of the flashy real estate marketing tools available today, the good old floor plan can be overlooked. This might be a mistake. Research shows that real estate floor plans remain among the most effective aspects of property marketing.

With all of the flashy real estate marketing tools available today, the good old floor plan can be overlooked. This might be a mistake. Research shows that real estate floor plans remain among the most effective aspects of property marketing.